JIRA Bug Plugins
Simscope can connect to Atlassian JIRA, allowing users to interact with directly bugs from the Simscope web interface:
| Action | Description |
|---|---|
| Link to bugs | Simscope → view JIRA bug |
| List bugs | Simscope → list known JIRA bugs |
| Create bugs | Simscope → create JIRA bug |
| Refresh bug status (from JIRA) (for Auto resolve flow) | Simscope ← JIRA bug |
Requirements
To connect Simscope to JIRA requires:
-
Atlassian JIRA
-
JIRA Cloud — token authentication
-
JIRA On-Premises (ie self-hosted)
- v7.4 — user/password authentication
- v8.14 — personal access token authentication
-
This also supports JIRA Service Desk, both self-hosted and cloud.
-
-
Python3
- Python
jirapackage — this requiresjirapackage version3.4.1or higher.
- Python
Note: to upgrade Python packages:
/path/to/python3 -mpip install jira --upgrade
If you are not allowed to upgrade, you can install the package into your home directory:
/path/to/python3 -mpip install jira --upgrade --user
JIRA Cloud API Tokens
If you are using JIRA Cloud (rather than JIRA on-premise), you need to use an API Token to authenticate from Simscope.
JIRA Self-hosted Personal Access Token (PATs)
If you are using JIRA on-premises (self-hosted), v8.14 or higher, you can authenticate using Personal Access Tokens (PATs):
Note: on-premise JIRA installations with older JIRA versions that do not have PAT support require using a dummy JIRA user, for Simscope to authenticate against. This can be any existing user, or it can be a robot user, like
"jenkins"or"simscope".
This mode uses plaintext password authentication, whereas PAT uses tokens.
Intro: notes on file and directory structure
If you use vanilla Simscope JIRA scripts (unchanged), please leave them in the
Simscope latest/bin directory.
- This way, the scripts auto-update if you upgrade Simscope.
If you do make changes to simscope-jira-create.py or simscope-jira-update.py, you
should:
- Copy
*jira*.pyto your$SIMSCOPE/bindirectory. - The disadvantage is if these change in future Simscope versions, you will be using the older
script sources.
- See steps 8/9 below.
JIRA Installation
To set up JIRA for Simscope:
- Move
TEMPLATE_simscope_jira_config.pyto your Unix HOME directory and rename to~/simscope_jira_config.py
Note: if you want to override this path (instead of storing in your home directory), set the environment variable
$SIMSCOPE_JIRA_CONFIGto the preferred location of yoursimscope_jira_config.pyfile.
- This requires the Python
jirapackage.
If you have not installed the jira package, you can install via command-line:
> pip install jira

# (alternative installation method):
> /path/to/python3 -mpip install jira
- Edit
~/simscope_jira_config.py
Set JIRA_ON_PREMISE to:
Trueif running standalone JIRA (on-premise)Falseif using JIRA Cloud
Edit the function jira_on_premise() or jira_cloud(), depending on which JIRA you
are connecting to, to set your authentication:
Change:
server = ...basic_auth = ...
- Edit the Simscope → JIRA component mapping:
The variable SIMSCOPE_TO_JIRA_COMPONENTS maps from Simscope component → JIRA project / component
For example, if you have simscope component called proj_cpu, and this maps to JIRA as
MARS / CPU Verif:
SIMSCOPE_TO_JIRA_COMPONENTS = {
    'proj_cpu': ['MARS', 'CPU Verif'],

    # Alternative example: JIRA project with no JIRA component
    'proj_cpu': ['MARS', None],
...
}
- Edit JIRA instances:
Edit the variable JIRA_DEFAULT_INSTANCE to point to either jira_cloud or jira_on_premise
Optional: if you have multiple JIRA server instances (ie different URL's), you can map
them to Simscope by project, using JIRA_PROJECT_INSTANCES.
This example sets SIM bugs to map to one JIRA instance and CPU bugs to map to a separate
server instance.
JIRA_PROJECT_INSTANCES = {
    # Table format:
    # 'JIRA_PROJECT': jira_instance_func

    'SIM': jira_on_premise_sim,
    'CPU': jira_on_premise_cpu,
}
- Optional: if you are using a different version of Python, change the first line to point to your Python interpreter:
#!/usr/bin/env ...
- Testing
simscope-jira-update.py
To test your JIRA configuration, run simscope-jira-update.py on the command-line
with valid BUG ID.
Example:
> PATH/simscope-jira-update.py SIM-13
-----
0 issues updated from JIRA (1 stale bugs, 0 bug errors, 0 skipped)
If successful, you should either see 0 issues updated (due to stale), or 1 issues updated
- Optional: Bug designation
You can set the bug designation field, if you want to flag bugs as DV or RTL.
Edit the simscope-jira-update.py and change this section:
        if True:
            # ----------------------------------------
            # NOTE: THIS IS A BOGUS CALCULATION (as an example)
            # → Replace this logic with your internal designation computation.
            designation = 'DV'
            if 'RTL' in issue_fields['component']:
                designation = 'RTL'

            issue_fields['designation'] = designation
            # ----------------------------------------
- Advanced Bug create
If newly created bugs require special fields, those can be added inside the following
code section inside the script simscope-jira-create.py:
> new_issue = jira.create_issue(...)
Simscope Configuration
Add the following to your simscope.config file:
[bugs]
# If this is set, automatically refresh all bugs on a fixed time interval schedule.
# NOTE: this works by calling the 'refreshplugin' script.
autorefresh = "2h"

# Shorter interval example: 30 mins
#autorefresh = "30m"

# Auto-resolve rules.  This enables automatic resolving of rules when a bug
# has been set to a fixed/resolved/closed state.
# > https://admin-docs.simscope.com/bugs/update.html
# autoresolverules = true

[bugtracker "JIRA"]
# NOTE: the official JIRA regex is here:
# https://community.atlassian.com/t5/Bitbucket-questions/Regex-pattern-to-match-JIRA-issue-key/qaq-p/233319
# example: SIM-12345
#regex = "[A-Za-z]+.[0-9]+"

# JIRA URL to view a JIRA bug in your browser
url = "http://COMPANY-JIRA-URL/browse/%s"

createplugin = "PATH/simscope-jira-create.py"
refreshplugin = "PATH/simscope-jira-update.py --json %s"
advanced = true
uppercase = true
-
Change the
urlto your JIRA URL, including the project name. The%swill be replaced by Simscope with your JIRA Bug ID (iePROJ-123) -
Change the
createpluginandrefreshpluginpaths to point to where you stored them in the Installation section.
Testing via command-line
To test simscope-jira-update, run it on the command-line:
# NOTE: replace with any valid JIRA ID
> PATH/simscope-jira-update.py SIM-1000
updated: SIM-1000
-----
1 issues updated from JIRA (0 stale bugs, 0 bug errors)
- Note: if you see stale bugs, this is OK. It just means that Simscope's cache of the bug is the same as JIRA's current state, so no updates were found.
- If you edit the bug in JIRA (or add a test comment), Simscope will be able to get an update.
Testing JIRA bug update/refresh from the web interface
Note: If you have changed the simscope.config file, restart the Simscope server first.
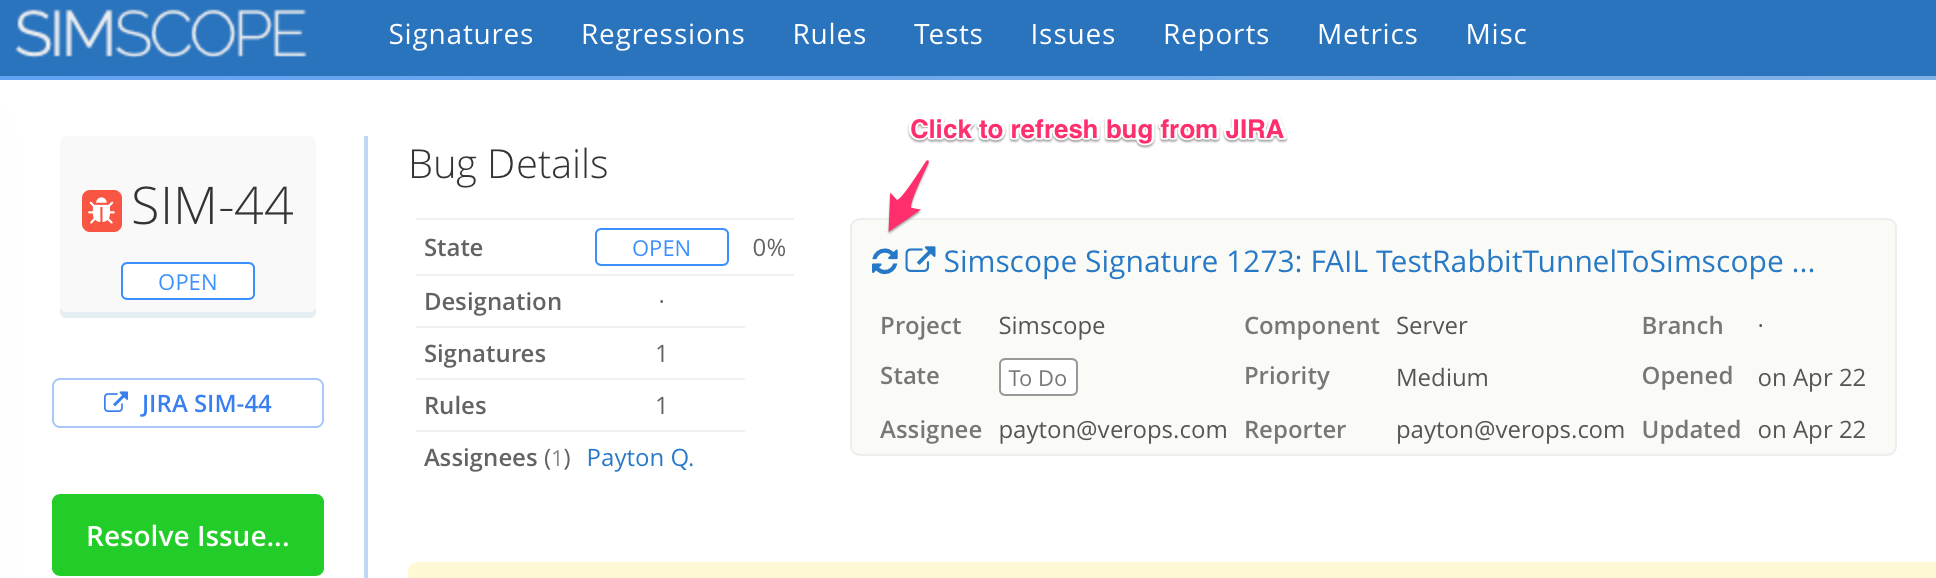
If JIRA is installed correctly, you should be to click on a bug and then refresh it within Simscope.
Here is an example of refreshing bug SIM-44:
Testing JIRA bug create from the web interface
Here is an example of creating a bug within Simscope.
- From Signatures, click
[+]to add a rule.
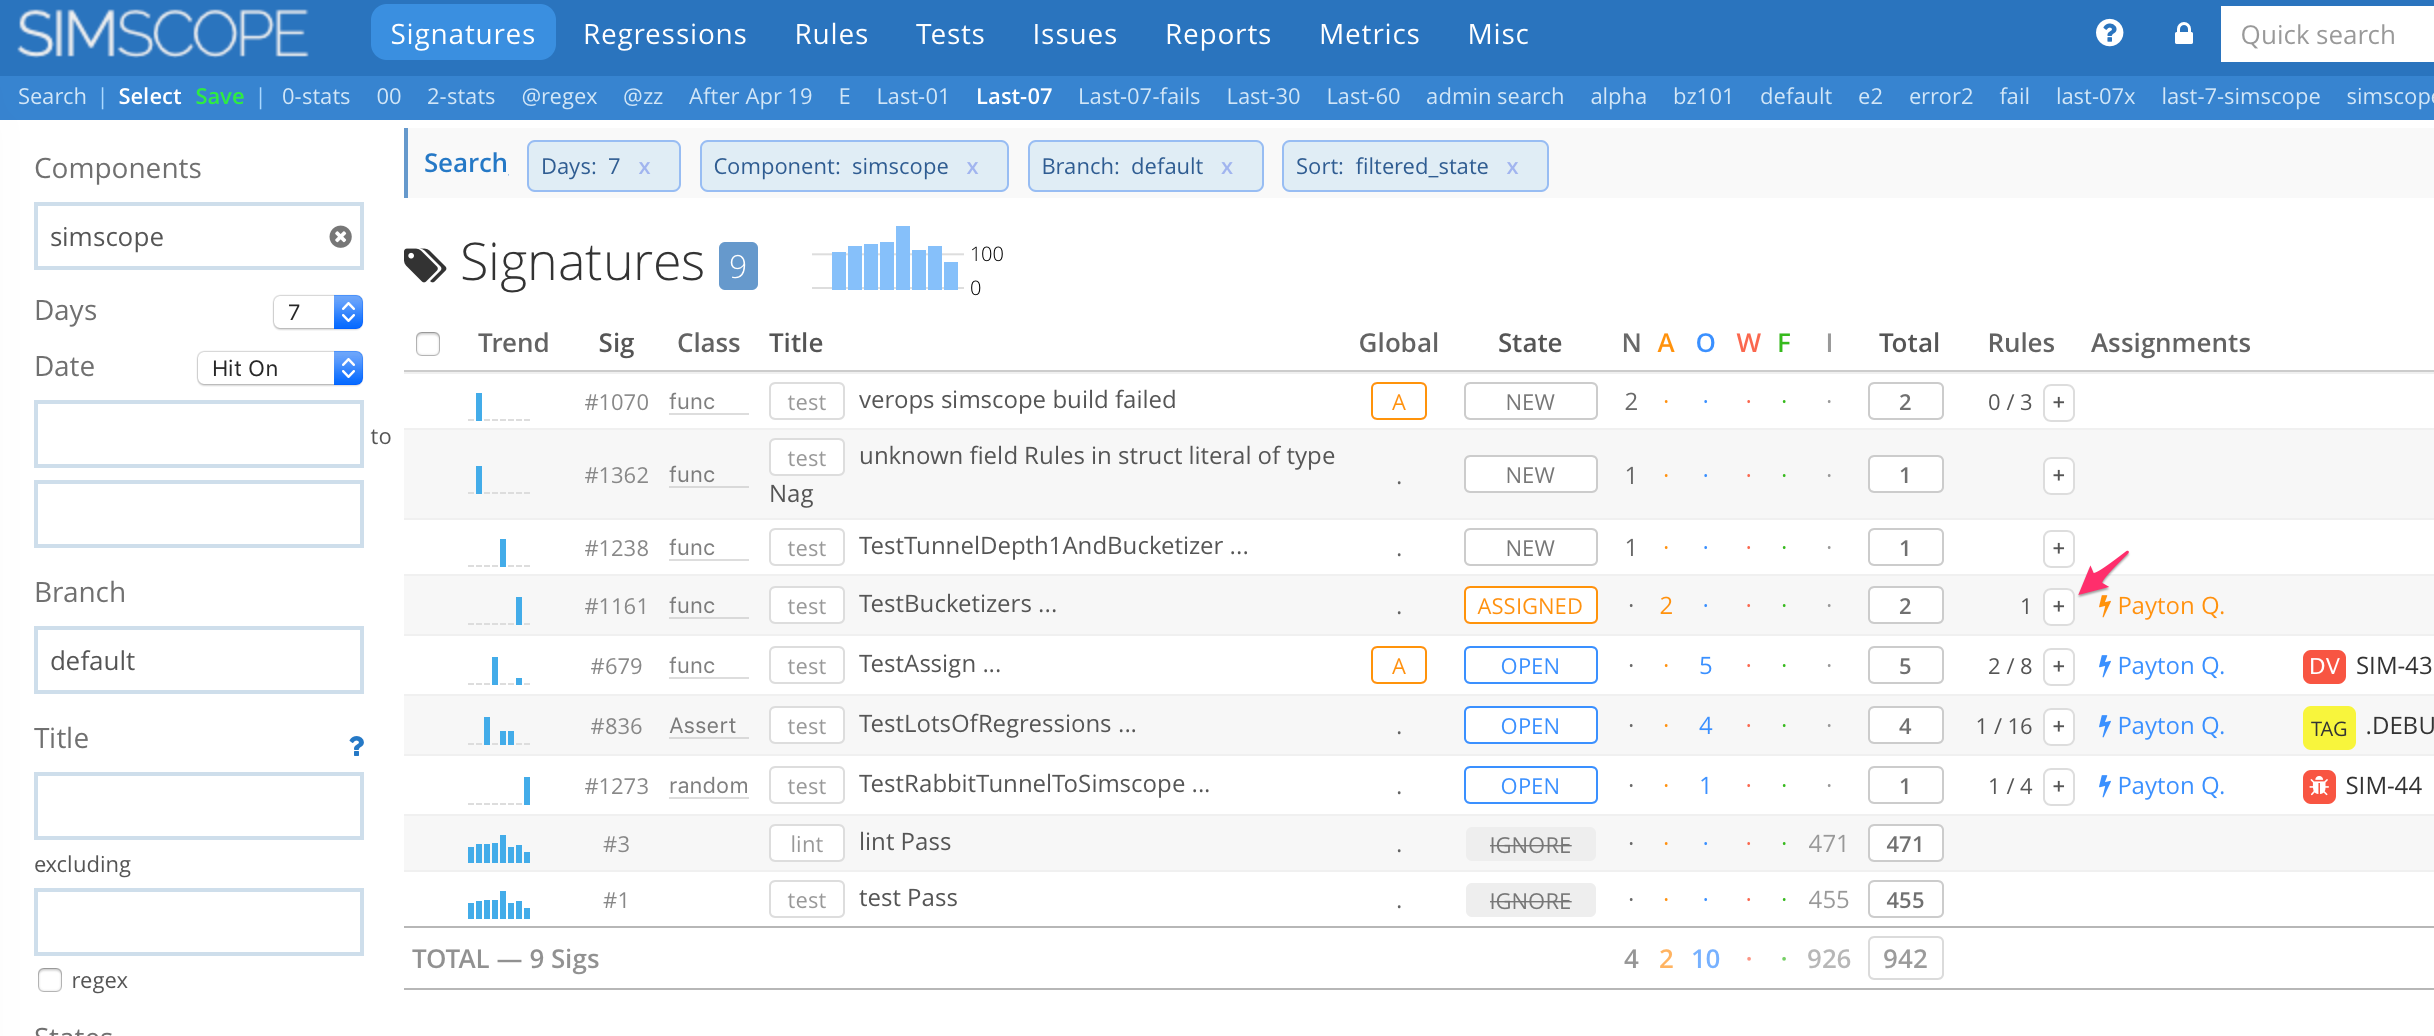
- Select an Assignee for the bug.
- Click the Create Bug in JIRA button.

If successful, you will see the new Bug ID from JIRA inside Simscope.
JIRA Error debugging
If the JIRA plugins fail, Simscope will dump the error to its server terminal, and also send back part of the error to the user's web browser.
Also note: you can change the Python plugin code on the fly (no need to restart Simscope, unless the plugin path has changed).
Optional: JIRA Self-Signed SSL Certificates
If you are self-hosting JIRA and using self-signed SSL Certificates, you may get this error
when connecting to JIRA via https:
WARNING:root:HTTPSConnectionPool(host='company-name.atlassian.net', port=443):
Max retries exceeded with url: /rest/api/2/serverInfo
(Caused by SSLError(SSLCertVerificationError(1, '[SSL: CERTIFICATE_VERIFY_FAILED]
certificate verify failed: unable to get local issuer certificate
Download certificate chain
In Firefox:
- Go to your JIRA URL.
- Click the Lock icon in the browser URL.
- Click Connection Secure → More Information.
- Click View Certificate.
- Click PEM (chain) to download the chained certificate (should land in your download directory).
Add certificate to JIRA connect
Add the certificate to your ~/simscope_jira_config.py:
    return jira.JIRA(
        server = 'https://JIRA-URL.COMPANY.com',

        # OPTIONAL: enable connecting via secure SSL certificates
        options = {
            'verify': '/path/to/company/root/certificate'
        },
    ...
Automatic Bug refresh flow
Simscope has an autoresolverules mode, where if a bug is resolved from JIRA, then rules
linked that bug can be automatically resolved in Simscope.
→ See the Bug Refresh / Autoresolve topic.